These are SO cute and Delish! I make Candy/Cookie Baskets for my husband’s clients for Christmas, which are one of the favorites in the basket. They’ve become a tradition that we really enjoy. The extra hands make the work go quickly too!!
This makes approximately 50. If we didn’t eat a couple of kisses while we peeled the foil off, we’d probably make 60!!
Tools: 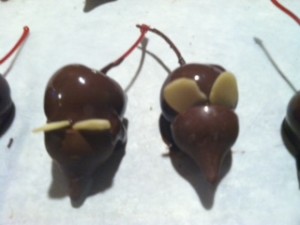
Parchment paper
Cookie sheet
Glass bowl
Refrigerator
Ingredients:
- 12 oz bag of Hershey kisses with almonds
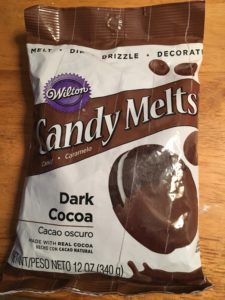
- 12 oz bag of Wilton dark chocolate candy melts
- 4 oz bag of slivered almonds
- 4 -8 oz jars of stemmed Maraschino cherries*
Recipe:
Line cookie sheet with parchment paper. I lightly rinse the cherries in water and drain well. Be gentle because the stems will fall off. Microwave the Candy Melts in a glass bowl. Start at a minute, stir and continue heating on 30 second increments until melted. Dip the cherry until fully covered in chocolate.
In your other hand take a kiss and join them together. Put them on the cookie sheet. While still wet slide in two slivered almonds for the ears. Let cool on the counter or put in the fridge to set. They don’t need to be refrigerated after the chocolate sets up. They will keep in a container for about a week or so.
DELISH TIP: Please eat these in one bite! It’s a big bite but it’s fun!! You get the whole flavor of the candy together instead of separately.
*Long stemmed cherries can be found in the cocktail section of stores. You can also find large jars at Bulk food stores.