• About WordPress
    • WordPress.org
    • Documentation
    • Support
    • Feedback
  • Log In
  • Skip to primary navigation
  • Skip to main content
  • Skip to primary sidebar

Seafood

Grilled Margarita Shrimp

August 26, 2017 by

Grilling in the summer is a no-brainer. Sometimes though the extreme heat can be an appetite killer. These shrimp skewers are nice and light and only take minutes to grill. The shrimp marinates for only 30 minutes so it’s really quick too!  If you continue to marinate the shrimp for an hour or so it will turn into ceviche, which is also delicious. So this recipe makes two completely different dishes! How fun!

Tools

  • Grill pan
  • bamboo skewers
  • One large zip top bag
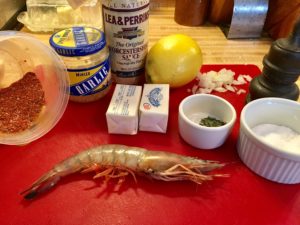
Ingredients

  • One pound of  large or jumbo raw shrimp, deveined and peeled
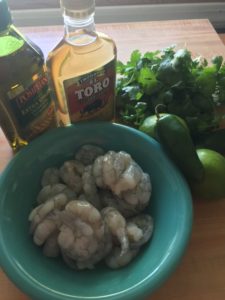
  • One lime -zest and juice*
  • 1/2 pint of  Tequila*
  • Two jalapenos diced, seeds removed
  • One tablespoon of  minced garlic
  • 1/2 cup of Cilantro chopped
  • One teaspoon of salt
  • 1/2 teaspoon of black pepper

Recipe

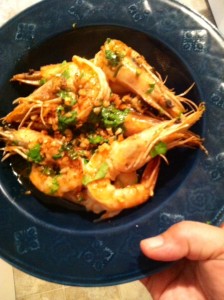
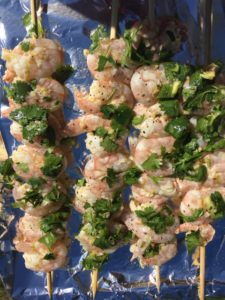
Combine all your ingredients into a large zip top bag and marinate for 30 minutes.  Place your shrimp on your skewers making sure you poke through the head end and the tail. Grill over high heat 2-3 minutes per side until shrimp is opaque.

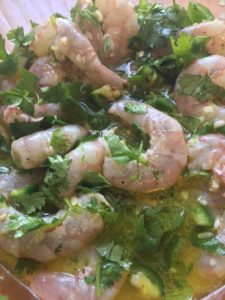
DELISH TIP 1:  If you want to eat the Margarita Shrimp like a ceviche then just marinate for another 30 minutes and the lime juice will cook the shrimp. Then chop up the shrimp and add some avocado and pour a little of the marinade with the shrimp and serve ice cold!

DELISH TIP 2:  Sometimes limes are a little dry. If you microwave them for 10 seconds and roll them with your hands on the counter it should be juicier for you.

DELISH TIP 3: I use the cheapest tequila I can find for this recipe because it has a lot of flavor.

Filed Under: Appetizers, Seafood

Gravlax with Orange and Dill

April 18, 2017 by

We love brunch! My husband and I like to have  a leisurely Saturday or Sunday brunch at home or out. I wish we could have it more often but those of you with children or weekend jobs know that leisurely brunches are few and far between.  If you can plan ahead to make brunch you can make this simple recipe of Gravlax. Gravlax is a salt cured salmon that is refrigerated for three days. The salt “cooks” the fish. You can put the Gravlax on bagels with cream cheese, crackers witha dill sauce or Creme fresh or scramble them into eggs. The uses are endless really. We used to buy lox at the store but as my daughter got older she liked to eat it too and it just got to be so expensive that I decided to create my own recipe. I really enjoy the flavors I use in this recipe but once you get the technique down you can add whatever flavors you like. This recipe serves 8-10 depending how much your people eat!

Tools

  • 9×13″ pan
  • aluminum foil
  • 2 large weights such as rocks, bricks, or cans
  • cutting board
  • zester/rasp/grater
  • VERY sharp knife
  • pliers**
  • baster
  • paper towel

Ingredients                                                                                       

  • 1 1/2 of fresh wild salmon with skin
  • 1/2 cup kosher salt
  • 1/2 cup of sugar
  • bunch of fresh dill
  • one orange- zest and juice
  • teaspoon of white pepper

Recipe

Slice your filet in half evenly as you can. Trace your finger down the fish and feel for bones. If you feel some use your pliers and pull it out.

Lay one half  of your salmon skin side down onto your pan. Mix your salt sugar, orange zest and stir to combine. Spread half of your mixture onto the salmon filet. Make sure the mixture covers every inch of salmon.

Place your dill on top of the salt/sugar mixture. Pour the rest of the salt/sugar mixture on top of the dill. Add your other half of salmon skin side up on top of the salt mixture. I like to squeeze the juice of the orange around the fish (If it’s a really juicy orange just use half) Wrap your pan with foil tucking around the salmon pieces. Weight down the salmon with your rocks, bricks or cans. Place in the fridge. IMPORTANT step: Twice a day you need to uncover your salmon, flip it over and baste with the juices that will come out of the fish. After the first day the salt/sugar juices will turn syrupy and that’s what you want. Rewrap the salmon and weigh it down.

On the third day, take out the salmon and rinse the excess salt and herbs off the fish. It will have shrunk in size and feel very firm. Pat dry with paper towel. Either wrap it tightly  and store it or slice it up and eat it!! Put it on a cutting board and with a VERY SHARP knife at about a 75 degree angle slice super thin slices of your beautiful gravlax. You should be able to almost see through it. I serve mine with brown cocktail bread and a honey mustard sauce*.

DELISH TIP 1: The honey mustard sauce is found under sauces on this site.

Filed Under: Appetizers, Breakfast, Seafood

Salmon Dip

April 17, 2017 by

I wanted to name this dip after my friend Tina’s sweet daughter Mikyla.  It is her absolutely favorite thing I make when we go to visit them at their farm in Gladwin, Michigan. My husband hot smokes salmon for us or we have also used purchased smoked salmon. This is a super quick dip to put together and it’s smokey and delicious on crackers, celery, or with endive as an elegant option. We usually eat this as an appetizer around the firepit or maybe watching our Detroit Tigers but this would be excellent at a ladies lunch or brunch. This recipe easily doubles.  I double or triple the recipe for Mikyla because she takes it for work for her  lunches and if I don’t no one else gets any!! Love you Mikyla!!

Tools

  • cutting board
  • Bowl
  • fork
  • sharp knife
  • rasp/zester/grater

Ingredients                                                                                                                 

  • 8 oz pieces of smoked salmon*
  • One stalk of celery dices
  • Zest of one lemon
  • juice of 1/4 lemon*
  • One small shallot diced*
  • Tablespoon of fresh dill
  • 1/2 cup of lite mayo
  • 1/8 teaspoon of pepper
  • 1/8 teaspoon of salt
  • Crackers, cut veggies or endive


Recipe

Break the smoked salmon into chunks with your hands. Smash the salmon with a fork until it flakes into small chunks. Zest your lemon, add your diced shallot, celery,  dill, lemon juice, salt, pepper and mayo. Refrigerate for at least an hour so the flavors meld together.

DELISH TIP 1:  I love shallots. If you dont have them use an onion. Sweet onions would be awesome.

DELISH TIP 2: Test the smokiness and saltiness of your salmon. You may not need to add as much salt as I did, or you may need to add more.

DELISH TIP 3: I use Light mayo. You may use whatever you like!

DELISH TIP 4: Use your lemon to taste also. Sometimes the lemons are super juicy and sometimes not. YOu can make a lemon juicier by putting it in the microwave whole for 10 seconds!

Filed Under: Appetizers, Seafood, Snacks

New Orleans Style Barbecued Shrimp

March 13, 2017 by

Head On Shrimp are my new obsession. They are very hard to find where I live in Michigan but running errands for my parents I found them at the grocery store a mile from their home! I spoke to the fishmonger and she said they had them every Saturday so now when I visit my parents I grab shrimp too!! Sometimes I peel the bodies (leaving the head on of course) and sometimes I just leave them whole and we peel and eat them. Using our hands is a yummy, buttery, shrimpy, delight. When eating head-on shrimp you HAVE to squeeze and suck the head; You do!! The sauce and the soft parts in the head make the most amazing sauce. It’s the whole point of buying head on shrimp. If you don’t want to do that then just buy large wild caught shrimp and it will still be a delicious dish! Make sure you have some crusty bread to sop up the sauce too.

Tools

  • 10 inch Saute’ pan
  • cutting board
  • tongs
  • rasp

Ingredients                                                                                                 

  • 12 jumbo Head-On Shrimp*
  • 2 Tablespoons of Worcestershire Sauce
  • 2 Tablespoons of diced shallot or mild onion
  • 1 Tablespoon of minced garlic
  • 1 Tablespoon of water
  • 1 teaspoon of black pepper
  • 1 teaspoon of Old Bay seasoning
  • 1/2 lemon zest and juice
  • 1/2 teaspoon of dried oregano
  • 1/2 teaspoon of dried thyme
  • 1/2 teaspoon of salt
  • 1/8 teaspoon of cayenne
  • 1 stick of  COLD butter
  • 1 teaspoon of olive oil

Recipe

Heat the one teaspoon of olive oil over medium high heat. Add the unpeeled** shrimp, Worcestershire, spices, garlic and 1 tablespoon of water in a heavy 10-inch saute’ pan. Add the zest of  1/2 the lemon and squeeze the juice from the half lemon over the shrimp. Over high heat, cook the shrimp while gently swirling the saute pan,  occasionally turning the shrimp. In about two minutes of cooking, the shrimp should start turning pink on both sides, so they are about half done.
Reduce the heat to medium-high and continue cooking as you gradually add the cold pieces of butter to the pan. While stirring the shrimp, swirl the butter pieces until they are incorporated into the pan juices, the sauce turns light brown and creamy as it simmers, and the shrimp are just cooked through. This will take about two minutes total if the shrimp are extra-large and about three minutes if they are colossal. Serve immediately in a bowl and pour the sauce over the top of your shrimp. Serve with crusty bread for sopping up the sauce and lots of napkins for cleaning your hands. Makes two servings.

DELISHTIP 1--Sometimes I like to peel the body from the shrimp and devein them. It just depends on how they look to me.  Just be gentle so the head doesn’t separate from the body. If it does just cook it anyway!

Filed Under: Appetizers, Seafood

Tuna Noodle Comfort Casserole

March 1, 2017 by

This is the utmost in comfort foods! This tuna casserole is the first dish I ever cooked. I was 12 or 13 and my mom who was a nurse got moved to afternoon shift until midnight, so  she taught me how to make this and I made it once a week all of my teen years so it gave her a break from cooking. When  I met my boyfriend David, now my husband, I made this for him too it really is a family favorite!  Our daughter Emily loves it. We don’t eat a lot of regular pasta anymore so it’s kind of a treat. In Michigan today the weather started out at 55 at 7 am and started snowing and 23 by 5 pm. So this was comfort we needed today! I suppose if you were from Minnesota you would call this recipe Hot Dish.

Tools                                                                    

  • 2 1/2 quart casserole pan
  • medium sized pot
  • large pan*
  • colander
  • wooden spoon
  • measuring cups and spoons
  • pot holders

Ingredients

  • 2 cups of  elbow macaroni
  • 1 can (10.5 oz) of cream of mushroom soup
  • 8 oz of cheddar cheese shredded
  • 5 oz can of tuna in water, drained
  • 1 Tablespoon of dried minced onion*
  • 1 cup of milk
  • 1/2 cup of fresh mushrooms, chopped (optional)
  • 1/2 cup of  frozen peas
  • 3 teaspoons of salt*
  • 1/2 teaspoon of pepper

Recipe

Put your water on to boil. Salt your water with 2 teaspoons of salt. Cook pasta 8 minutes or to directions on the box. Preheat your oven to 375 degrees Fahrenheit.  Combine tuna, soup, dried onion, mushrooms, milk, salt, pepper and frozen peas and ALL BUT 1/2 cup of the cheddar cheese in the saucepan and cook on low heat until melty. Drain pasta and mix into the sauce. Pour into your casserole pan and sprinkle with the remaining cheese. Bake for 30 minutes uncovered.  Remove from oven and let sit for 5 minutes before serving.

DELISHTIP 1— If I have them you can add crunched up potato chips on top of the cheese if you like.

DELISHTIP 2–If you don’t have dried minced onion just use 1/4 cup of fresh diced onion.

Filed Under: Kid Friendly, Pasta, Seafood

  • Page 1
  • Page 2
  • Next Page »

Primary Sidebar

About Me

Welcome to my site!

Follow Me On Twitter

Read More…

Sign Up For Updates

Categories

Let’s Connect!

  • Facebook
  • Instagram
  • Twitter
  • YouTube

Recent Posts

  • Make Dinner Rolls From Pizza Dough
  • Slow Cooker Beef Pot Roast
  • Gravy 101
  • Oreo Truffles
  • Basil Pesto

Copyright © 2023 · by Shay Bocks · Built on the Genesis Framework · Powered by WordPress